Introduction
Are you ready to take your computer building skills to the next level? Installing a motherboard is a crucial step in building your dream PC. It might seem like a daunting task, but fear not! In this comprehensive guide, we will walk you through every step of the process, ensuring a smooth and successful installation.
Advantages of Proper Motherboard Installation 👍
Properly installing a motherboard offers several advantages for PC enthusiasts. It provides a stable platform for all your computer’s components, ensuring optimal performance and longevity. A correctly installed motherboard also allows for easy upgrading and customization, enabling you to unlock the full potential of your system.
Disadvantages of Improper Motherboard Installation 👎
On the other hand, a poorly installed motherboard can lead to a myriad of issues. It can cause frequent system crashes, overheating, or even permanent damage to sensitive components. Avoiding these disadvantages is crucial to enjoying a smooth and hassle-free computing experience.
Key Features to Look For in a Motherboard 🔍
Before diving into the installation process, let’s take a quick look at the key features you should consider when choosing a motherboard:
| Feature | Description |
|---|---|
| Socket Type | The type of CPU socket supported by the motherboard |
| Form Factor | The physical size and layout of the motherboard |
| RAM Slots | The number of slots available for RAM modules |
| Expansion Slots | The number and type of slots for adding expansion cards |
| Connectivity Options | The number and types of ports available for peripherals |
Step-by-Step Guide to Installing a Motherboard
Step 1: Preparing Your Workstation 🛠️
Before getting started, make sure you have the necessary tools and a clean workspace. Gather a screwdriver, thermal paste, and any cables or accessories that came with your motherboard. Ensure proper grounding by touching a metal object to discharge any static electricity.

Step 2: Choosing the Right Motherboard 🔧
Selecting a motherboard that matches your specific requirements is crucial. Consider factors such as compatibility with your CPU, RAM capacity, and expansion options. Read user reviews and consult reliable sources to make an informed decision.

Step 3: Gathering Components 🔌
Before installation, gather all the necessary components such as the CPU, RAM modules, graphics card, and storage devices. Ensure they are compatible with your chosen motherboard and have the required connectors.

Step 4: Preparing the Case 🖥️
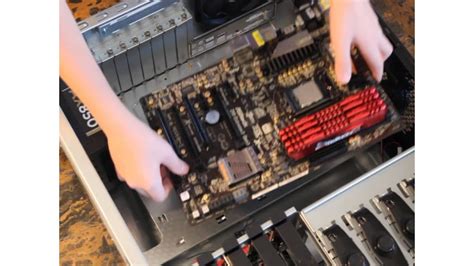
Open your computer case by removing the side panel. Identify the motherboard tray and locate the standoffs for your specific motherboard size. Install the standoffs in the designated holes to provide proper support.

Step 5: Installing the Motherboard 🛠️
Carefully place your motherboard onto the standoffs, aligning the screw holes. Secure the motherboard in place using screws or fasteners included with the case. Ensure that all connectors and ports are easily accessible and face the back of the case.

Step 6: Connecting Components 🔌
Connect your CPU, RAM modules, storage devices, graphics card, and other components to the motherboard. Refer to the manuals or online guides for each component to ensure proper installation.

Step 7: Powering Up and Testing ✅
Connect the power cables, ensuring a secure and proper connection. Double-check all connections and cables before turning on the power. Power up your system and enter the BIOS to ensure all components are detected and working correctly.

Minimum Specifications for Motherboard Installation
| Component | Description |
|---|---|
| CPU Socket | Compatible CPU socket for your chosen motherboard |
| RAM Slots | Number of available slots for RAM modules |
| Expansion Slots | Number and type of slots for adding expansion cards |
| Form Factor | Physical size and layout of the motherboard |
| Connectivity Options | Number and types of ports available for peripherals |
About the Application
This guide provides a step-by-step approach to installing a motherboard, ensuring a successful and optimized computer build. Download our comprehensive application for easy access to detailed instructions, real-time troubleshooting, and community support.
| Operating System | Download Link |
|---|---|
| Android | Download here |
| iOS | Download here |
Frequently Asked Questions (FAQs)
1. Can I install a motherboard without professional help? 🤔
Yes, with the right tools, knowledge, and patience, you can install a motherboard on your own. Follow our detailed guide and seek help from online communities if needed.
2. How long does it take to install a motherboard? ⌛
The installation can take anywhere from 30 minutes to an hour, depending on your experience level and the complexity of your build.
3. Do all motherboards fit in standard computer cases? 🖥️
No, motherboards come in various form factors such as ATX, Micro-ATX, and Mini-ITX. Ensure compatibility between your chosen motherboard and case.
4. Should I apply thermal paste before installing the CPU cooler? 🌡️
Yes, applying a thin layer of thermal paste helps improve heat transfer between the CPU and cooler, ensuring efficient cooling.
5. How can I ensure proper grounding during the installation process? ⚡
To prevent damage from static electricity, wear an anti-static wristband and regularly touch a metal object or grounded surface.
Conclusion
Installing a motherboard may seem daunting at first, but by following our detailed guide, you’ll be able to do it with confidence and precision. Take your time, double-check every connection, and seek help from online communities if needed. Building your own PC is a rewarding experience, and a properly installed motherboard is the foundation of a powerful and reliable system. Get started today and enjoy the benefits of customizing and upgrading your own PC!
Remember, the motherboard is the heart of your computer, and a well-installed one will ensure smooth operation and maximum performance. So get your tools ready, gather your components, and embark on this exciting journey of installing a motherboard. Happy building!
 Atechguide Online Banking & Android App